Oil and Water: The Science Behind Paper Marbling
By Amy Hand
Hey there Smart Art friends and welcome to the May blog!
I hope you’re all really excited to dive, literally, into the world of paper marbling with us this month. I certainly am!
Paper marbling is an ancient art with its roots in 10th century Japan but it has only gained in popularity over time with videos all over Youtube of how to marble just about anything! Now you get the opportunity to learn some age-old skills and create some stunning art of your own with the wonderful supplies in this month’s box.
When considering the subject of this post the main thing I found myself wondering was; how does it actually work? The thing that makes paper marbling so magic to me is how it seems to defy all logic and somehow still come out as something beautiful. The way the paint sits on the surface of the water, swirling into intricate curlicues, is mesmerizing. The fact that it can go from the water onto paper to create one-of-a-kind art is just the cherry on top of this whole experience. This intrigued me enough to want to investigate a little.
So, today we are going to put our science hats on and look at what water marbling is and how it works on a scientific level. Don’t worry we won’t be getting too technical, just enough for you to really understand why, sometimes, art and science can hold hands to make some really fun creations!
Let’s start by taking a look at all the components we’ll need to get marbling.
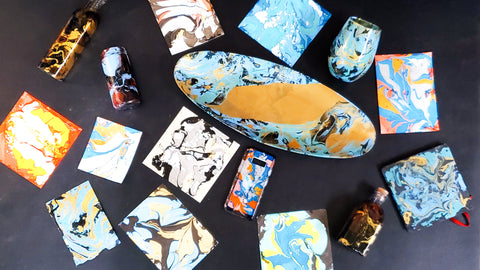
Paper Marbling Materials

At this point, you’ve probably had a good look through the brochure so you know that the only materials you will need to start off with are the Marabu Easy Marble paints, a tub of water, and your paper. Nice and simple. I suggest also being in a well-ventilated area wearing some clothes you don’t mind getting a little messy.
For today we’ll be looking in general terms at the qualities needed for each material to be able to marble successfully and not necessarily focus on one brand. There are lots of different materials that suit this technique so it really gives you a lot of room to explore once you’ve got a handle on it. So let’s look at our main three and what makes them special:
Big surprise, there’s nothing special about the water you’ll be using, just plain old tap water will do just fine. There are some forms of paper marbling that use corn starch or even shaving cream as a base but for now, we’re keeping things traditional and going with good old water. The special factor actually comes with when we look at the paint.
The choice of paint here is very specific, you can’t use just anything you have lying around. Acrylics, watercolors, and many other water-based or water-soluble paints will not work for this technique. The property that we are looking for in our paint is that it is not dissolvable in water and is preferably oil-based. The Marabu Easy Marble paint is a solvent-based paint that is not dissolvable in water which is why, as the name suggests, it marbles so easily. Spray paint also works for this technique because it is oil-based but that’s a lot messier than the pourable paint options.
The paper itself is also something that you need to get right. Obviously, if you dunk a piece of printer paper in water and paint it will disintegrate! That’s why we’ll be using 300gsm card stock postcards. These are a good, hardy thickness that can hold up to a lot of water. They also have a good, porous surface for the paint to grip onto, which is essential for some paints. What I love about these little cards is that they’re really easy to dip with one hand, which makes them a perfect starter paper when you’re still new to paper marbling. Once you’ve got used to the paper you can move on to acrylic and then onto whatever your heart desires. Play a game of will it marble if you like!
So now that we’ve had a good look at what materials we’ll be using we can actually investigate how the paint and water create this stunning marbling.
How Paint and Water Marble

Now to answer the question of the moment: Why does it marble?
Lucky for us, the principles involved are actually pretty simple to understand. The process relies on two main factors: the properties of the paint and the differing densities between the water and the paint to achieve a successful marble.
The paint that works for water marbling is less dense than water so when it is gently poured onto the surface it naturally floats on top. To achieve this it's important not to add the paint from too high up or it will break the surface of the water and sink.
So we’ve got density working for us, now why doesn’t the paint just disappear into the water? Well, it's a classic ‘oil and water don’t mix’ situation. The solvent or oil-based paint that we use for marbling is hydrophilic, which means it repels water. This prevents the two substances from mixing at all, resulting in the floating raft of marbling paint sitting on the surface of the water.
While it's floating the paint will be really easy to manipulate because of the way water naturally flows. This will give you some beautiful organic shapes in your pieces that are hard to imitate by hand. You can marble the colors together with a skewer, blow on it gently with a straw or let the water do its thing for you. The colors that make up the raft of paint is free to mingle with each other as the water gently manipulates it.
Then all that's left is to transfer the paint to your chosen surface.
Fixing the Paint on a Surface
So how do you make the paint transfer seamlessly from water to paper? Yet again, this is all down to the paint properties so while it's still science it's a little less hands-on.
The best paint for paper marbling is one that can adhere to many surfaces. The Marabu Easy Marble paints in your box, for instance, are suitable to be used on paper, glass, acrylic, metal, wood and so many more! If you use the right paint for what you are marbling, which is very important for this artform, the paint should adhere to your surface with just a little skewer work to tidy up the edges. Some paints require a porous surface so this is where your postcards will work perfectly. A little tip to ensure that your paints grabs the surface without water getting in between is to dip really quickly without hesitation and pull it out really gently.
At the end of the day, the success of this art form is all down to picking the right materials with the right scientific properties from the very beginning, and, luckily, we’ve done that for you already with this month’s box! Now, all that’s left for you to do is take your newly found knowledge and use it to make some incredible marbled creations.
I hope you enjoy taking this ancient art and creating something amazing with it. I know that you are going to be making some stunning unique pieces with your creativity and just a little splash of science.
Check out the Smart Art Previous Projects!
